If you have played around with metafield editor extensions, explored shortcodes, and created content editing Shopify apps you may be a part of a group wondering - how can you give the shop owner more control over shop customization and still maintain an intuitive admin system. We've got one word for you: Sections.
🔥 TIP - more and more themes in the Shopify Theme Store support sections. If you are looking to get into theme development, building out themes with modular customizable sections is a great direction to head in!
Why Sections
Sections answer a lot of development and end user requests. They allow you to create reusable templates that the shop owner can continuously add and re-arrange. Sections are also a great tool for uploading and displaying additional media content. For example, on the collection, where you are limited to one featured image, you can create a highly customizable image gallery of product looks. Moreover, they offer a wonderfully integrated and streamlined user interface for the shop owner to interact with.
Creating Your First Section Template
Sections live in a sections folder in the root of your theme. In that folder you can create a new section with a .liquid extension. The name of the file will be the name you reference when you include your section in your template file.
The folder structure will look a little something like this
your-theme
  - assets
  - config
  - layout
  - sections
    - - your-cool-section.liquid
  - templates
and if you wanted to include your-cool-section in your collection template you would add the following to the templates > collection.liquid file:
{% section 'your-cool-section'%}
The Section Template File: The Base Setup
Now that you have all the bone structure set up, it's time to create the actual code that will make up the section.
Three new liquid tags were introduced with the advent of sections: {% schema %}, {% javascript %}, and {% stylesheet %}. In this post we are going to focus on the schema tag, but we will incude all three in the base of the template. The base template in your your-cool-section.liquid file will look like this:
{% schema %}
{% endschema %}

{% stylesheet %}
{% endstylesheet %}

{% javascript %}
{% endjavascript %}
You can probably extrapolate that the stylesheet and javascript tags can hold your css and js respectively. We aren't going to get into those. We'll be working in the schema tag, where you will be defining much of the functionality of your section.
The Section Template File: Starting with the Schema
The schema tag expects valid JSON. Your entire section schema can be defined in one JSON object comprised of different settings and blocks. Let's take a look at an example section schema and break it down from there.
{% schema %}
  {
    "name": "gallery",
    "blocks": [
      {
        "name": "image",
        "type": "image",
        "settings": [
          {
            "id": "image_thing",
            "type": "image_picker",
	    "label": "Gallery Image",
	    "info": "Upload an image to be added to the image gallery on the homepage"
          }
        ]
      }
    ]
  }
{% endschema %}
Directly nested inside of the overarching object is the information for the section. In this instance we are creating a Static Section. What this means is that the section is included directly in the template using the {% section 'your-cool-section'%} tag. When the shop owner changes / edits the section it will change for all referenced instances of this section across templates.
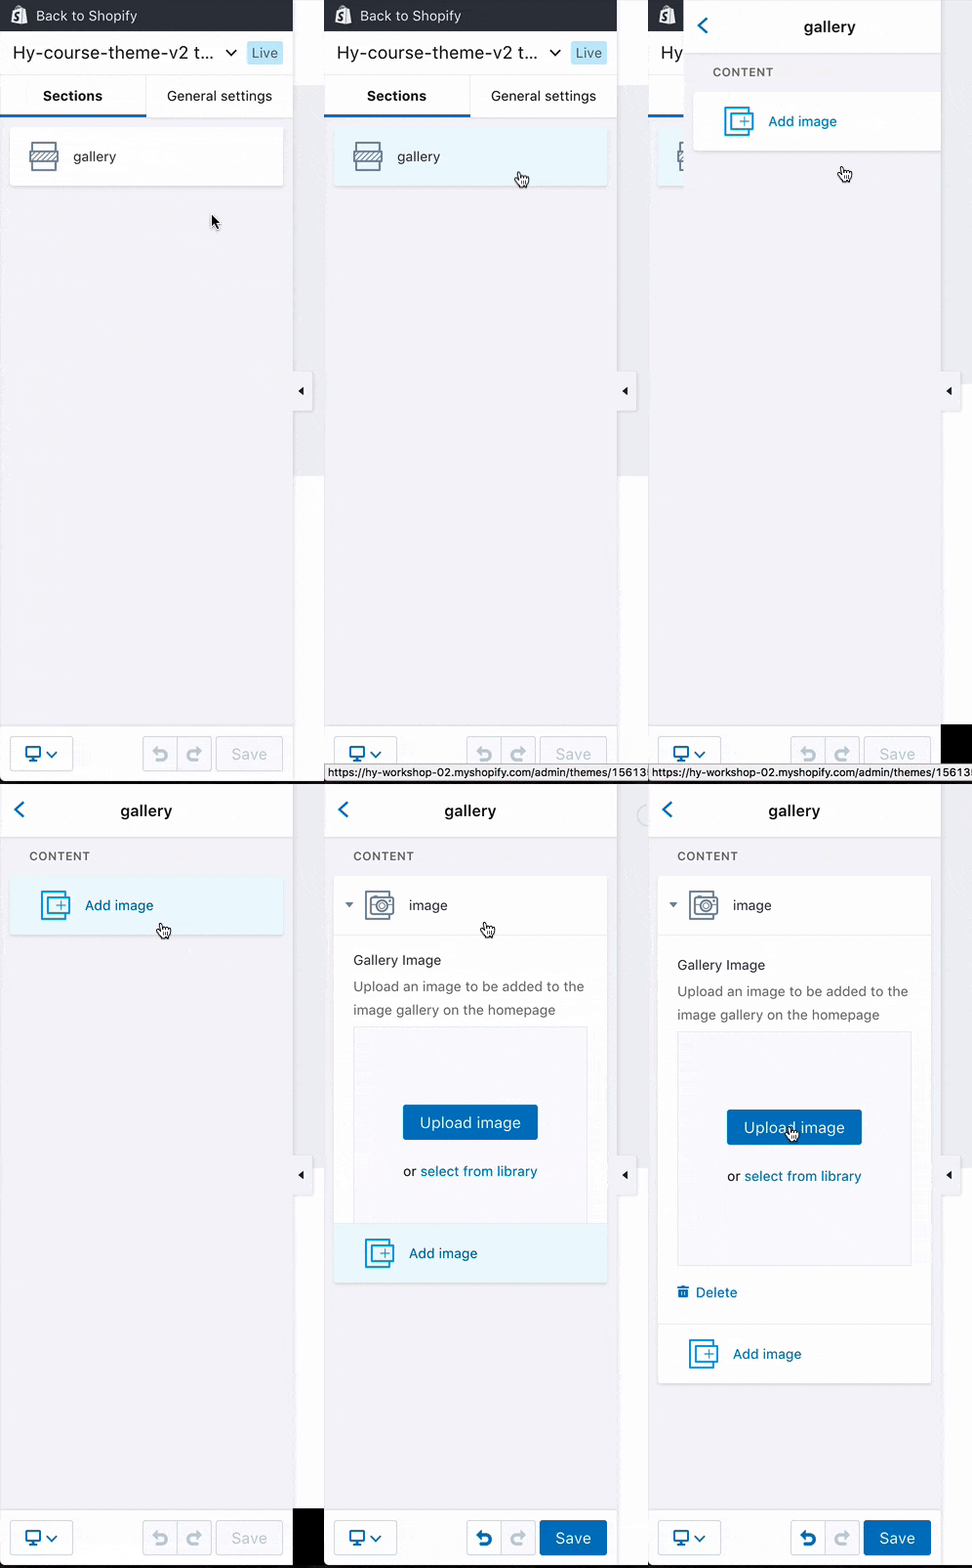
The name is what the section will be referred to on the sidebar when the shop owner goes to edit it. In this case we wanted to make a photo gallery section where shop owners could add photo blocks, so we named it gallery
🔥 Tip - The shop owner will be able to edit sections by clicking Customize Theme under Online Store > Themes. Once in the online theme editor your sections tab will be on the sidebar on the left-hand side. Make sure you are on the page the section content will show up on in order to edit the section (i.e. If the gallery is showing up on the homepage navigate to the homepage in the store preview and then click the section tab).
The following properties are available to sections:
- name defined in the section schema, this is the name that the section will be referred to in the sidebar.
- class each section will be rendered in a div with a class of shopify-section. Class allows you to specify an additional class name to add to the section div.
- settings similar to the settings_schema file, sections have their own settings. For more general info on available settings check out our blog post on Theme Customization - Implementing Your Settings. The id in the settings needs to be unique within a section, but not necessarily across sections.
- blocks these are repeatable, well, blocks available in a section. The shop owner can add, remove, and reorder these 👌.
- max_blocks allows you to limit the number of blocks the shop owner can create in a section. If not set the shop owner can keep creating blocks... forever.
Those are all of the properties we are going to go over in this post, but you can check out the section documentation for more.
After the settings for the overall section, there is a blocks key with a value that includes the settings for the blocks as well as the name and the type.
"blocks": [
  {
    "name": "image",
    "type": "image",
    "settings": [
      {
        "id": "image_thing",
	"type": "image_picker",
	"label": "Gallery Image",
	"info": "Upload an image to be added to the image gallery on the homepage"
      }
    ]
  }
]
The name and type are required for the block. Of note, unlike in the settings where the type indicates the type of content and must correspond with one of the expected content types (check out the settings_schema.json docs for more on this), the type directly nested in the blocks need not line up with one of these data types.
🔥 Tip - The settings and the blocks keys expect an array as a value, that's why you see an object directly inside an array for both of those properties 😉
All that code will amount to something like this in the online theme editor

